🚀 Getting Started with Family Budget Tracker
Welcome! This guide will help you set up your account and start tracking your finances accurately.
Step 1: Create Your Account
- Go to family-budget.getdigraw.com
- Click "Sign Up"
- Enter your email and create a password
- Verify your email (check spam folder if needed)
- Log in to your new account
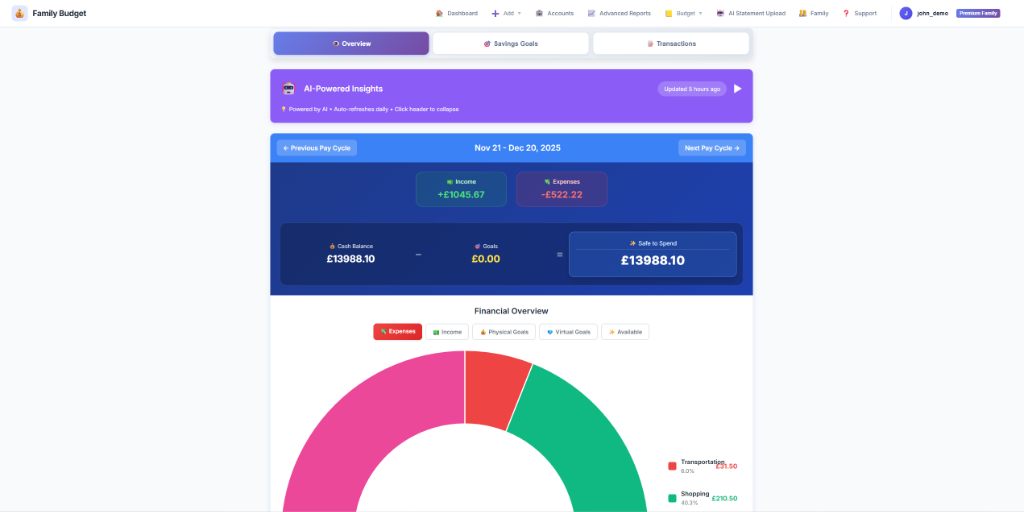
Step 2: Set Up Your Pay Cycle
Tell us when you get paid so we can track your budget accurately.
- Go to Settings → Pay Cycle Settings
- Choose your pay frequency:
- Weekly - Every 7 days
- Bi-weekly - Every 14 days
- Monthly - Once per month
- Set your Pay Day (e.g., "16" for 16th of month)
- Click "Save"
Step 3: Add Your Bank Accounts
Add all accounts you want to track. Precision is key here for accurate "Safe to Spend" calculations.
- Go to Accounts in the navigation
- Click "+ Add Account"
- Fill in:
- Account Name (e.g., "Chase Checking")
- Account Type (Bank Account or Credit Card)
- Currency (USD, GBP, EUR, etc.)
- Initial Balance & Date:
- CRITICAL: This must be the actual bank balance on the date you select.
- Example: If you start uploading statements from June 19th, enter the Closing Balance of June 18th as your initial balance, and set the date to June 18th.
- Bank Accounts: Use positive numbers (e.g., 5000)
- Credit Cards: Use negative numbers for debt (e.g., -1200)
- Budgeting Account Checkbox:
- Check this for cash-flow accounts (Checking, Credit Cards).
- Uncheck for investment or mortgage accounts (assets that don't affect daily spending).
- Click "Add Account"
Step 4: Upload Your First Statement & Get Insights (Premium)
Let AI extract transactions automatically. Premium Solo includes 15 uploads/month and Premium Family includes 30 uploads/month.
How to Upload:
- Go to AI Statement Upload
- Click "Upload Statement"
- Select your account
- Upload your PDF or image (Max ~10 pages recommended)
- Wait for AI processing and validation.
Validation & Scoring:
- 100% Score: Perfect match! (Opening Balance + Transactions = Closing Summary Balance)
- < 70% Score: Usually means the Account Summary table is missing or unreadable. You will likely need to manually check transactions.
- Correction Process:
- Check the number of transactions detected vs your statement.
- Double-check categories and descriptions.
- If the result is poor, delete the statement and try uploading again (clear image/scan).
- If correct, click "Confirm & Add" to save to your ledger.
Step 5: Set Budget Limits
Define spending limits for each category to get alerts.
- Go to Budget → Budget Limits
- Click "+ Add Budget Limit"
- Select a category (e.g., "Groceries")
- Set your monthly limit
- Click "Save"
Step 6: Create Savings Goals
Track progress toward financial targets.
Physical Goals (Separate Account)
- Use this when you transfer money to a non-budgeting savings account.
- To Fund: Upload the statement for the target account OR use the Fund Transfer button.
- Manual Fund Transfer:
- Click "Fund Transfer" on the goal card.
- Select the date (match your bank statement).
- Important: If the transaction already exists in your uploaded Source Account statement (as a debit), uncheck the "Source Side" box. Only check "Target Side". This prevents duplicate transactions.
- If no statement exists for either side, check both boxes to create both debit and credit transactions.
Virtual Goals (Mental Allocation)
- Use this to "earmark" money that stays in your checking account.
- To Fund: Click "Quick Fund".
- Select the date and amount.
- This instantly creates an internal allocation transaction and reduces your "Safe to Spend" without moving actual money.

Recurring Goals Note
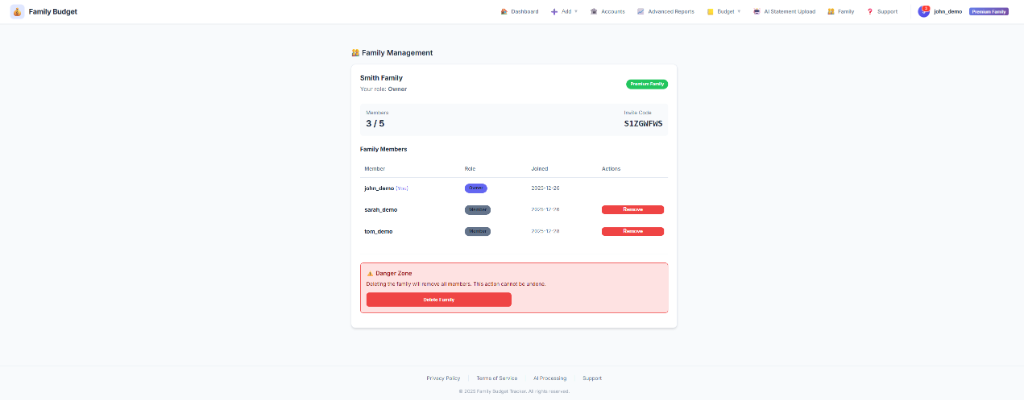
Step 7: Invite Family
Share budgets and track finances together. Both Free and Premium plans support families!
- Go to Family in navigation
- Click "Create Family"
- Share the invite code with your family.
Compare Family Plans
Choose the plan that fits your family's needs:
| Feature | Free Family | Premium Family |
|---|---|---|
| Family Members | Up to 5 members | Up to 5 members |
| Shared Features | ✅ Shared Dashboard & Goals | ✅ Shared Dashboard & Goals |
| Notifications | ✅ In-App Alerts | ✅ In-App Alerts |
| Recurring Txns | Limited (10/mo) | Unlimited |
| Accounts | 1 Account per person | Unlimited Accounts per person |
| Reports | Basic (Income vs Expense) | Full Analytics |
| Data Export | ❌ | ✅ Transaction CSV Export |
| AI Upload & Insights | ❌ Manual Entry Only | ✅ Auto-Extract + Daily Insights |
🎉 You're All Set!
Congratulations! You've completed the setup.
Need Help?
Email us at support@getdigraw.com - we respond within 24 hours!